It is not recent that AI has begun to find a significant place in our industry and influence it. However, it is undeniable that the development of underlying hardware technologies such as GPUs and CPUs has accelerated the growth of AI and the speed of its introduction into the current industry. With the help of this hardware development, advanced technologies such as voice and facial recognition in smartphones and autonomous driving technology of automobiles are commonplace. It has become an era of entrusting complex tasks, typically performed by a human, to artificial intelligence. AI has become an inseparable factor in our lives, and it is growing in a direction that includes AI in all industries.

The role of the sensor
If AI is analogous to the human brain, then what provides the data to the ‘brain’ so that the AI can develop through accumulated experiences? Sensors. Drawing on our comparison, sensors can be thought of as the sense organs of artificial intelligence; just as in the human body, without these sensory organs, the brain or AI gains no experience from which to learn. As mentioned earlier, various underlying technologies have been developed, and sensors have also developed at a rapid pace. Take for instance common mobile devices that we use countless times a day, which can be thought of as nothing more than a collection of sensors – cameras, GPS, microphone, accelerometer, gyroscope, compass, pressure, proximity, light sensor, etc. Various sensors become your eyes and ears, while the data required by the operating system and applications is constantly being provided by the outside world. The number and type of these sensors continue to increase, and at the same time their size, power consumption, and price are all decreasing. For this reason, it is easy to understand that even inexpensive portable devices are equipped with various sensors.
To acquire and process this diversified and increasing amount of sensor data, the frequency of involvement of the application processor such as CPU or MCU inevitably increases. Therefore, recent sensor technologies are trying to reduce power consumption and become smarter so that the sensor can take charge of functions that are typically driven by the application processor. As part of this effort, sensor makers have gained a competitive advantage by embedding mechanisms capable of performing simple conditional functions in the sensor themselves. The benefit of these internal functions is that the power consumed by the application processor to acquire and judge all of this incoming data can be significantly reduced.
Importance of MLC
Recently, driven by the need for reduced power always-on AI, sensor vendors such as STMicroelectronics have developed a Machine Learning Core (MLC) to embed the model without the application processor operation. Due to this, it is possible to operate the machine learning model directly inside the sensor, maximizing battery life. This is an innovative work that breaks the stereotype that machine learning requires at least MCU-level computing power.
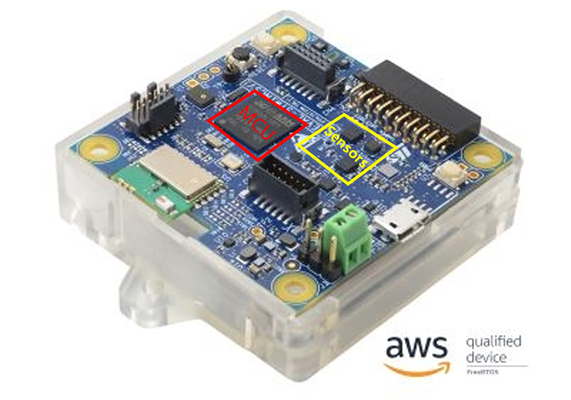
From here, we will look at the advantages of using the machine learning core (MLC) of the sensor compared to running the machine learning model on the application processor. In this example, we will consider STWIN SensorTile wireless industrial node (STEVAL-STWINKT1) – herein known as STWIN – a 120MHz Coretex-M4 MCU with FPU and ISM330DHCX with MLC (Machine Learning Core).
The benefits of performing inside the sensor of the ML model can be summarized as follows:
1. The sleep state can be maximized by minimizing the workload of the MCU (or AP), and battery usage can be maximized by switching the MCU into low-power mode.

As can be seen in the figure above, when the MCU needs to process the ML model, it switches the ‘mode’ of the MCU in response to the interrupts generated by the sensor, it then reads the sensor data and stores it in RAM to execute the ML model functions. As such, the MCU has very little time to maintain the sleep state of the core, and it is not easy to switch the power mode to low-power. However, when using the Machine Learning Core (MLC), the MCU can stay in the Sleep state most of the time unless an event (output result of the ML model) occurs in the sensor, so it spends most of the time at the minimum current provided by the MCU.
Here is an example of STM32L4R9 installed in STWIN. If you check the datasheet of the MCU, you can see the current consumption table as below. Here, assuming a maximum 120MHz operation clock in consideration of the ML model and the load of MCU, minimum current consumption of 18.5mA must be guaranteed for the MCU to run a basic model. However, in the case of using MLC, MCU can minimize the current consumption of the core by switching to Low Power Mode, so assuming that a 2MHz clock is used, current consumption of at least 490uA is required. Therefore, in the case of using MLC, a current consumption gain of approximately 38 times can be obtained through simple calculation.

2. Next, efficiency is high in terms of data traffic. Most inertial sensors have a 3-axis sensor output to express 3D space, and there are many cases where a 16-bit ADC is used. Therefore, even if one sensor packet is read, 6 bytes of data traffic is generated. The amount of data increases exponentially according to the type of sensor and ODR. For example, if you calculate the amount of data to be read by a gyroscope and accelerometer with 104Hz ODR in units of 1 second, you can see that ( 6 + 6 ) x 104 = 1248bytes of traffic per second is required.
However, in the case of MLC, if it is assumed that the number of classes of the ML model is less than 256, the classification result can be checked immediately by reading one byte of the MLC0_SRC.

If it is assumed that one MLC event per second occurs, this can be said to have 1248 times the efficiency.
3. As a result, if the frequency of use of MCU is lowered, ML processing products can be composed only with sensor standalone circuit design, and thus a cost savings effect can also be achieved. It is a well-known fact that the price of an MCU is several times higher than that of a sensor, from the product designers’ perspective, unit price competitiveness is a critical issue related to survival in the market and is a major concern for all manufacturers. Therefore, it can be said that a sensor with MLC has great price competitiveness, manufacturers should think about how to make the most of the MLC function.
Competitiveness of AutoML
As mentioned earlier, the need for machine learning in edge devices continues to increase, and low-power cores and sensors are also embedding Machine Learning Core to secure market competitiveness. When considering the reason why these MLC products are not so widely used in the market even though they are becoming more common, we find it is because using embedded ML or MLC core is somewhat complicated and requires specialized knowledge.
For example, to build a model, data must be collected. To judge the validity of the collected data, it will need to be visualized through various tools, the valid and non-valid parts will then need to be cropped and labeled to create a meaningful dataset for learning – this process is repeated until sufficient data is obtained.
A machine learning model is then built with this data, and the model is estimated through several metrics such as cross-validation. This process requires expert knowledge in parameter settings. Following, the model created in this way must be converted into an MLC model, and the converted model must then be written into the sensor and driven. It is then necessary to verify whether the model performs well or not, and if the model does not achieve the expected performance, additional iterations must be performed to find the optimal model. This process is the most difficult part of the machine learning life cycle, and it contains complex tasks that are difficult to perform alone as an ML engineer.
Is there a way to make these complex processes easier and more intuitive, which can even verify the built model in a short time?
Enter Qeexo AutoML, a brilliantly simple, fully automated end-to-end machine learning platform capable of leveraging sensor data to rapidly create, deploy, and verify machine learning solutions for edge devices running on MCU or MLC. Built for scalability, Qeexo AutoML’s no-code system allows anyone with a machine learning application idea to collect and edit data, train models, and deploy solutions to hardware for live testing, all from the highly intuitive web interface.
Currently, Qeexo AutoML supports two different reference devices that provide MLC capabilities – SensorTile.box and STWINKT1B – these boards are equipped with LSM6DSOX and ISM330DHCX sensors supporting MLC.

This SaaS environment is an advantage and only comes from Qeexo AutoML, using the simple user interface and well-designed platform to train, test, and deploy models for MCU and MLC, it is easier and faster to implement ideas that may have otherwise been deprioritized due to the difficulty of implementing ML devices, maximizing your time, effort, and even financial effect until you test and commercialize your solution.

In conclusion, the driving of ML models of embedded devices is increasingly taken for granted. And the sensors are also embedding the ML core. In this technological flow where ML driving methods are diversifying, Qeexo suggests an easier way. And, for users who have not been able to challenge the use of the sensor’s MLC core due to the difficulty of entry, we present a very simple method to verify the model you made with your own hands on the actual MLC sensor in just a few minutes. In addition, various advantages of using MLC were explained in this article. Therefore, it is recommended to build your own model by building MLC through Qeexo AutoML and try it yourself.

To discover what you can achieve with Qeexo AutoML and MLC register at Qeexo.com.
For any questions, comments, or help getting started with Qeexo AutoML don’t hesitate to reach out and contact us here.